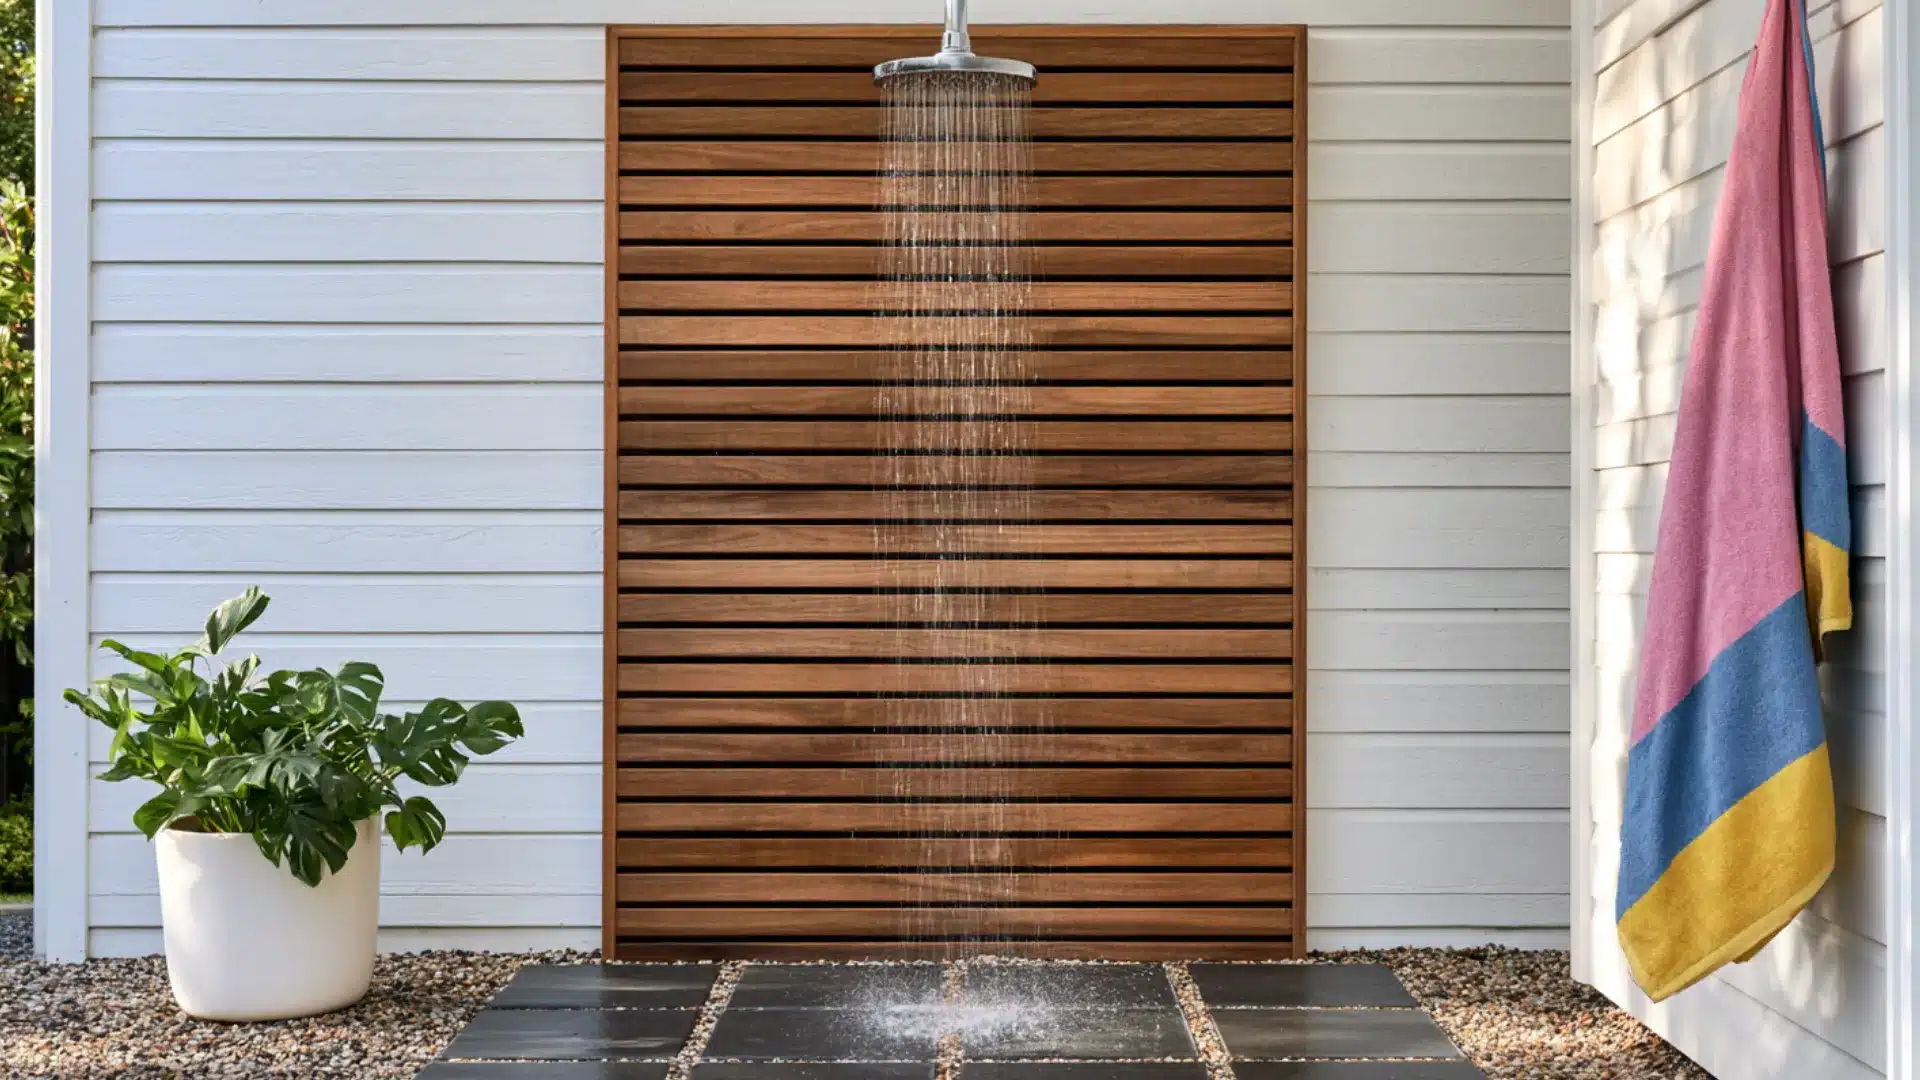
That grimy, chlorine-soaked feeling after a swim or a muddy afternoon in the yard deserves better than a drip trail across the patio.
Add cedar walls, a stone floor, and warm water overhead, and rinsing off starts to feel less like a chore and more like a few minutes at a backyard retreat.
I have talked to plenty of weekend DIYers who assume this project needs a licensed plumber and a big budget. It does not.
Building your own DIY outdoor shower comes down to digging, a bit of concrete work, and connecting a few pipes, skills most homeowners can pick up as they go.
Below, we will walk through the full build from posts to plumbing, cover a few style options worth considering, and break down what it actually costs to build one yourself.
Why Build a DIY Outdoor Shower?
You could hire someone, but there is a solid case for building this one yourself.
It is cheaper too, since materials alone cost a fraction of what a crew charges for labor, and none of the actual work- digging, framing, or hooking up a bit of plumbing- needs any special training.
You just need patience and a free weekend, and you end up with exactly what you pictured instead of whatever a contractor feels like building that day.
The layout, the finish, and every small detail stay entirely your call. There is also something satisfying about standing under a shower you built with your own hands.
Plan Before You Build
Careful planning helps you choose the right location, water supply, drainage, privacy, and materials before construction begins.
Checking local codes and site conditions early can prevent costly changes later.
- Choose the Right Location: Pick a spot with easy access to water lines, good privacy, proper drainage, and enough sunlight and airflow for drying. Avoid areas near foundations or where runoff may cause damage.
- Check Local Building Codes: Review permit rules, plumbing requirements, drainage guidelines, and setback regulations before starting. Call 811 to locate underground utilities and ensure safe digging.
- Decide How Permanent You Want It: Determine whether you want a fully plumbed, semi-permanent, or temporary setup, as this will affect materials, cost, and installation complexity.
Planning these details early helps prevent costly changes later.
Tools and Materials for a DIY Outdoor Shower
Before starting the build, here is everything you will need:
| Tools | Materials |
|---|---|
| Mini-excavator | Stone/gravel |
| Mud mixer | Rapid-setting concrete mix |
| 2×6 lumber (for forms) | Rebar and rebar ties |
| Snap cutter | 2-inch perforated PVC pipe |
| Laser level | Geotextile fabric |
| Tiling trowels | Tile-safe thinset mortar |
| Tile diamond polishing pads | Large-format tile |
| Metal drilling tool | Grout |
| Hammer drill | CPVC pipe, primer, and cement |
| Miter saw | Expansion anchors |
| Caulking tool | Composite privacy panel system |
| Wrench/socket wrench | Weather-resistant shower panel with head |
| — | Gate latch and hinges |
| — | Shower drain |
| — | Threaded rod, washers, and nuts |
Safety Note: This project involves cutting pipe, mixing concrete, and tying into your home’s water supply. Wear eye and hand protection, shut off water at the main before opening any supply line, and confirm your local codes and permit requirements before you begin. If you are not comfortable with any plumbing or electrical step, bring in a licensed professional for that part.
Step-by-Step Guide: DIY Outdoor Shower
From digging the first hole to turning on the water, here is the full build broken into steps you can follow in order.
Step 1: Excavate the Area
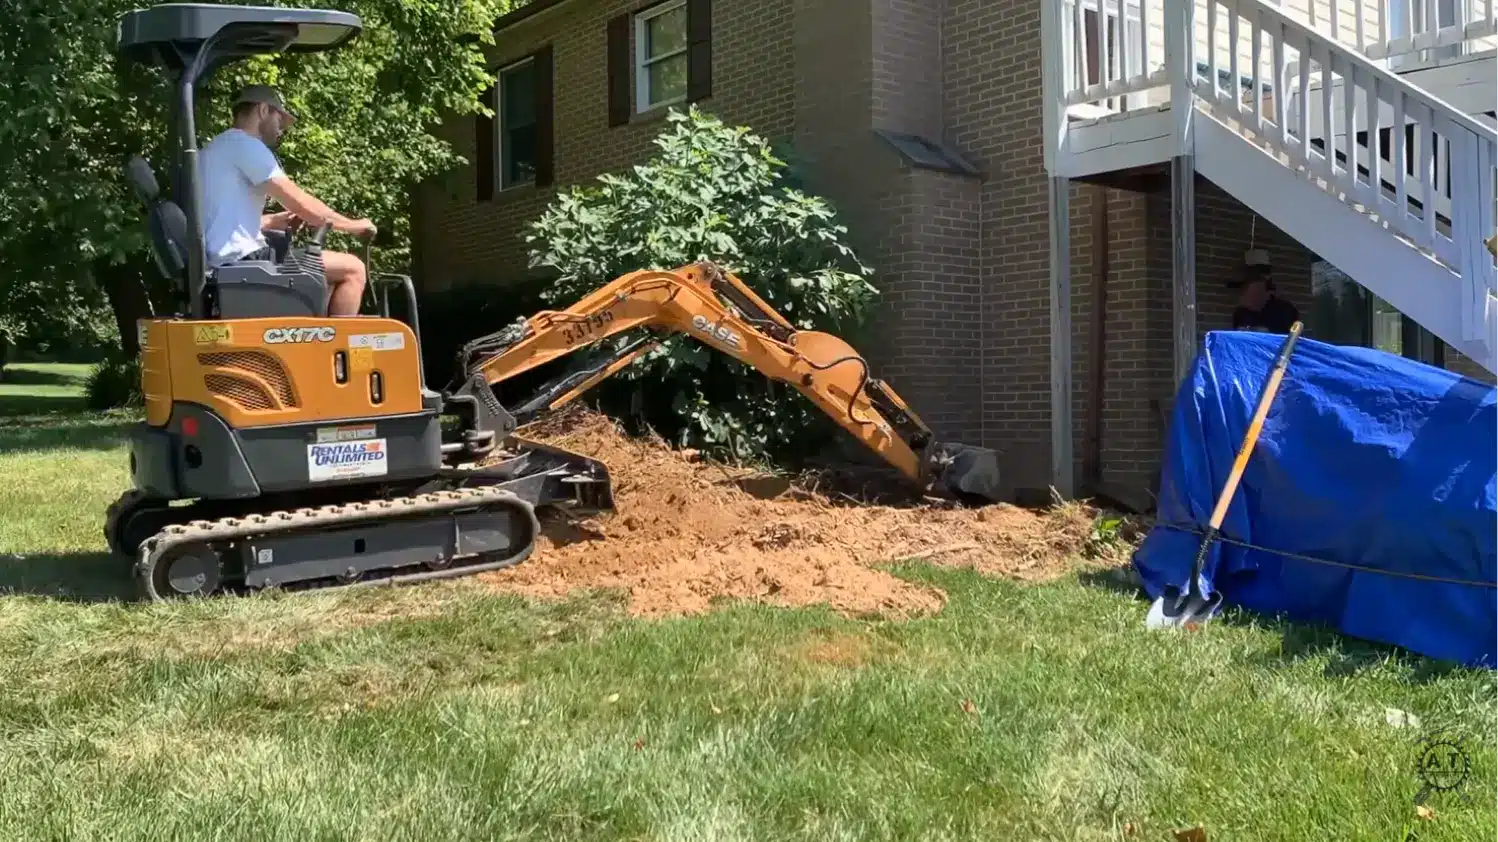
Start by excavating the build area to a depth of roughly 10–12 inches to create a level, firm base to work from.
A mini-excavator rental makes short work of this, especially if you are clearing out old root systems; tree or shrub roots can be far tougher than expected and significantly slow hand digging.
Once cleared, compact the soil thoroughly to give yourself a solid foundation for everything that follows.
Step 2: Dig and Install the Drain
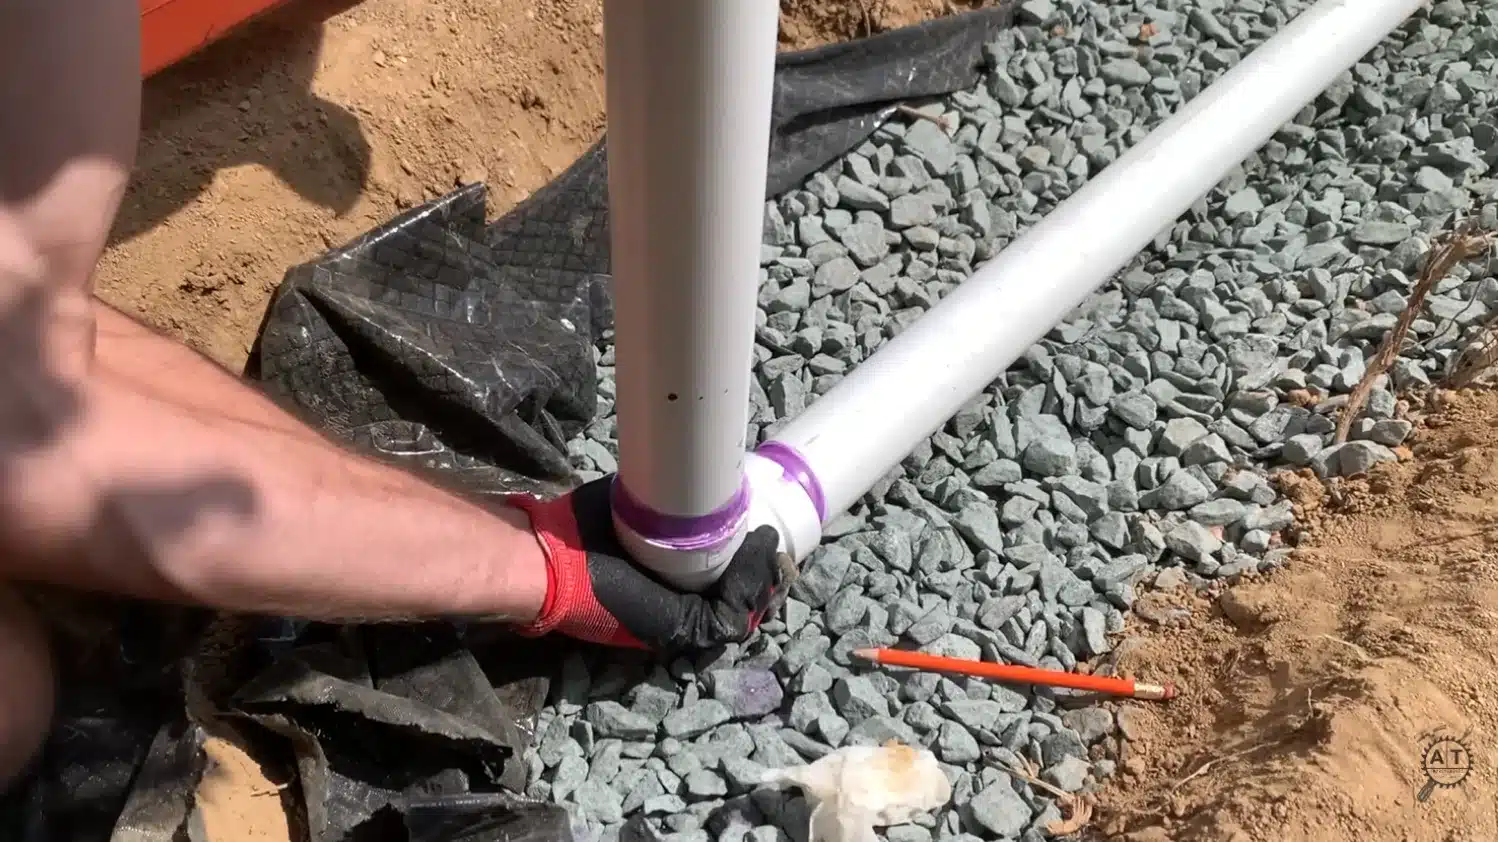
Dig a sloped trench for your drain pipe, adding a stone base layer before positioning a length of perforated 2-inch PVC pipe inside it.
Slope the pipe toward the drain’s deepest point, then wrap the surrounding stone in geotextile fabric before backfilling; this keeps dirt from clogging the perforations over time.
Test drainage with a hose before fully backfilling.
Step 3: Build and Pour the Concrete Shower Pan
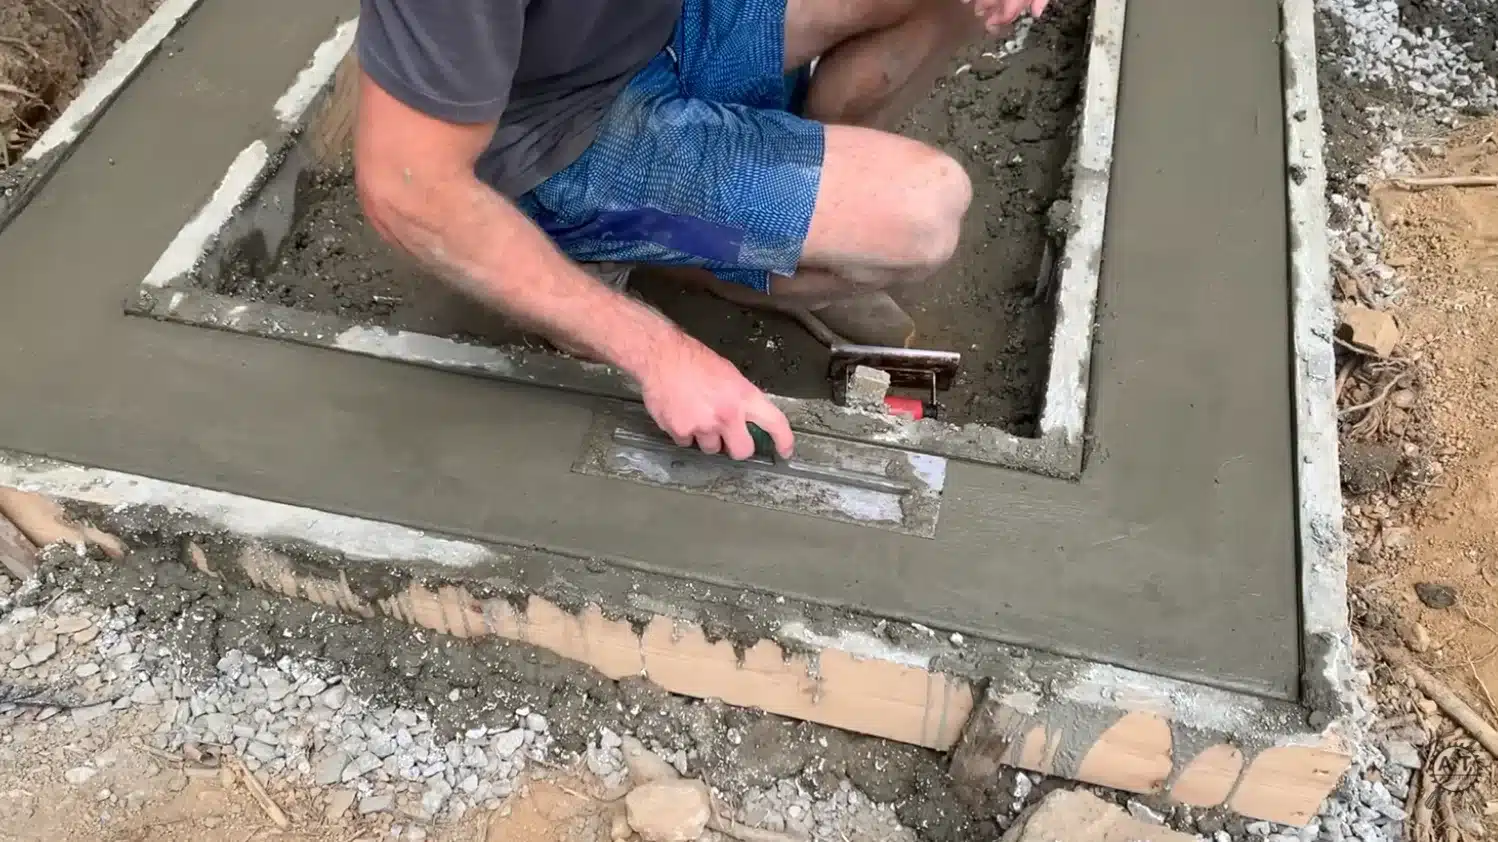
Build a perimeter concrete curb (roughly 4×6 feet) using 2×6 lumber forms, reinforced with tied rebar.
Mix a rapid-setting concrete (like Rapid Set 24/6) with a mud mixer, pour the curb, and let it cure overnight.
Set your shower drain level, then pour a sloped concrete shower pan over the stone base, using a ledger board as your high-point reference.
Step 4: Tile the Shower Pan
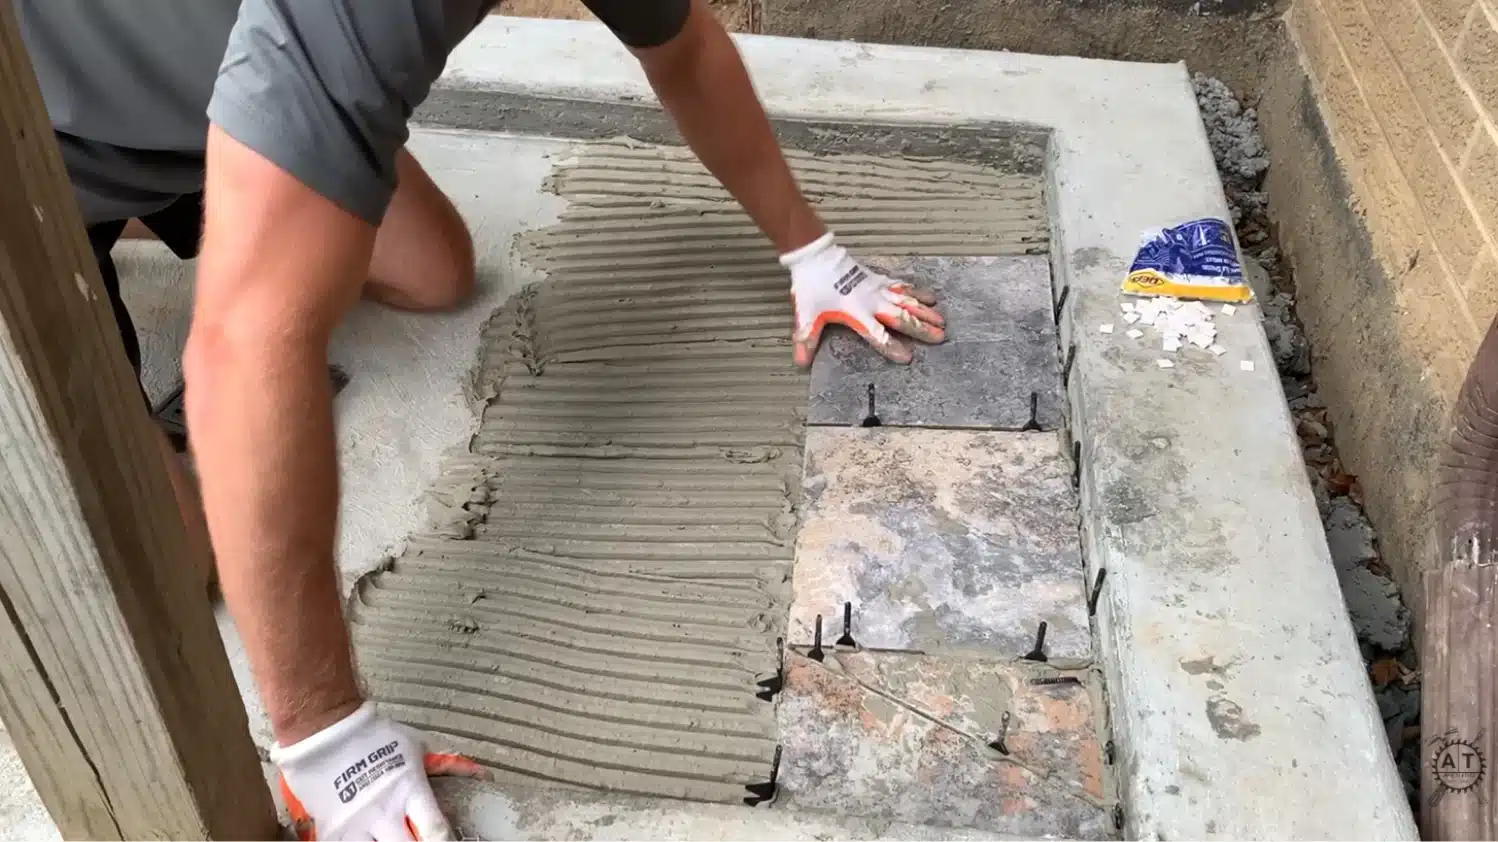
Apply a tile-safe thinset mortar and set large-format tiles, using spacers to maintain consistent gaps and a tile-leveling system to prevent lippage between pieces.
Cut relief notches around the drain so the tile follows the pan’s slope instead of sitting flat.
After the thinset cures for several hours, grout all the lines and clean up excess mortar while it is still workable; waiting too long makes cleanup much harder.
Pro tip: Tiling is not mandatory; sealing bare concrete and using that as your finished pan is a perfectly valid shortcut.
Step 5: Run the Supply Plumbing
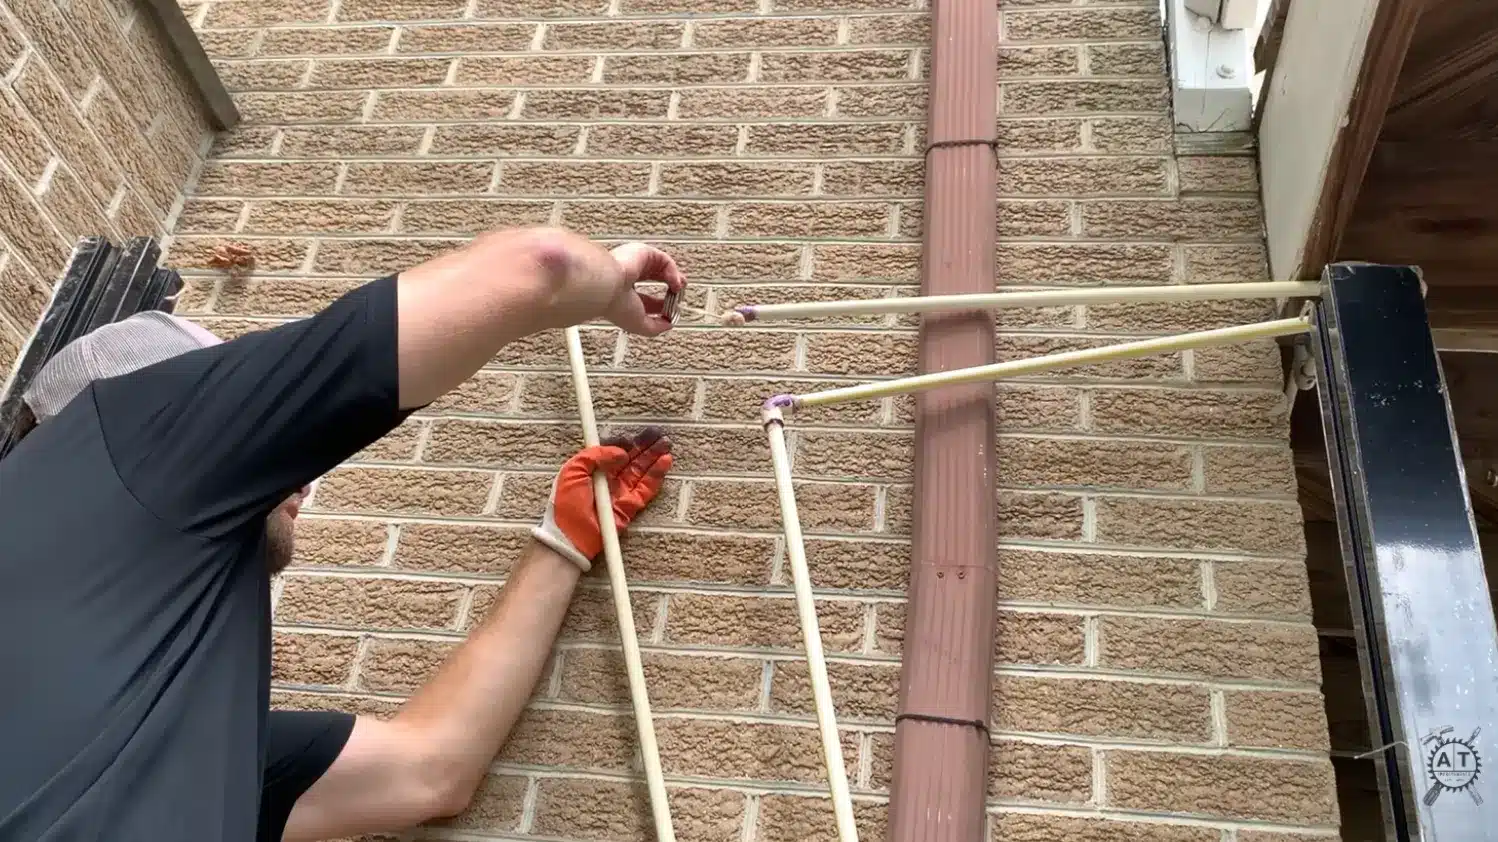
Tap into the existing hot and cold CPVC lines, cut them with a snap cutter, and install a branch tee to redirect water to the shower.
Glue all connections using CPVC primer and cement, then route the lines from the source out to the shower’s wall panel.
This step often means working in a crawl space or tight access point, so plan for some awkward positioning and double-check every joint is properly sealed before closing anything up.
Pro tip: Add a shut-off valve on the cold line; it helps prevent frozen pipes during colder months.
Step 6: Install the Privacy Panel Walls
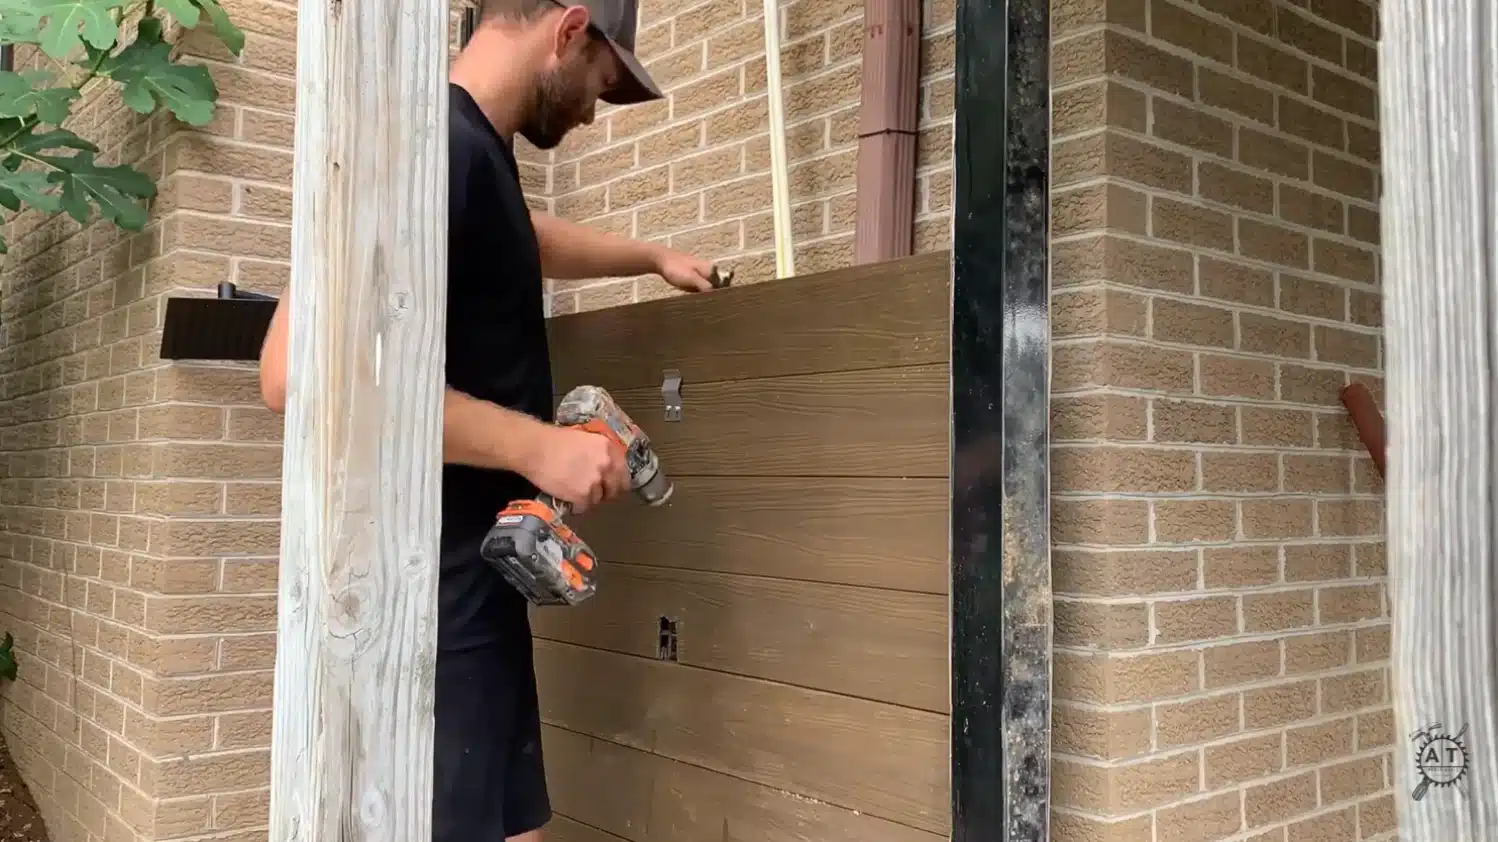
Mount vertical support posts into the concrete curb using expansion anchors, checking each post for plumb and shimming as needed before final tightening.
Slide composite slat boards between the posts to form the walls, using central connectors between boards to prevent warping as the material expands and contracts.
Repeat on the remaining sides, cutting boards to size with a miter saw wherever a full-length panel won’t fit cleanly.
Step 7: Install the Shower Panel and Head
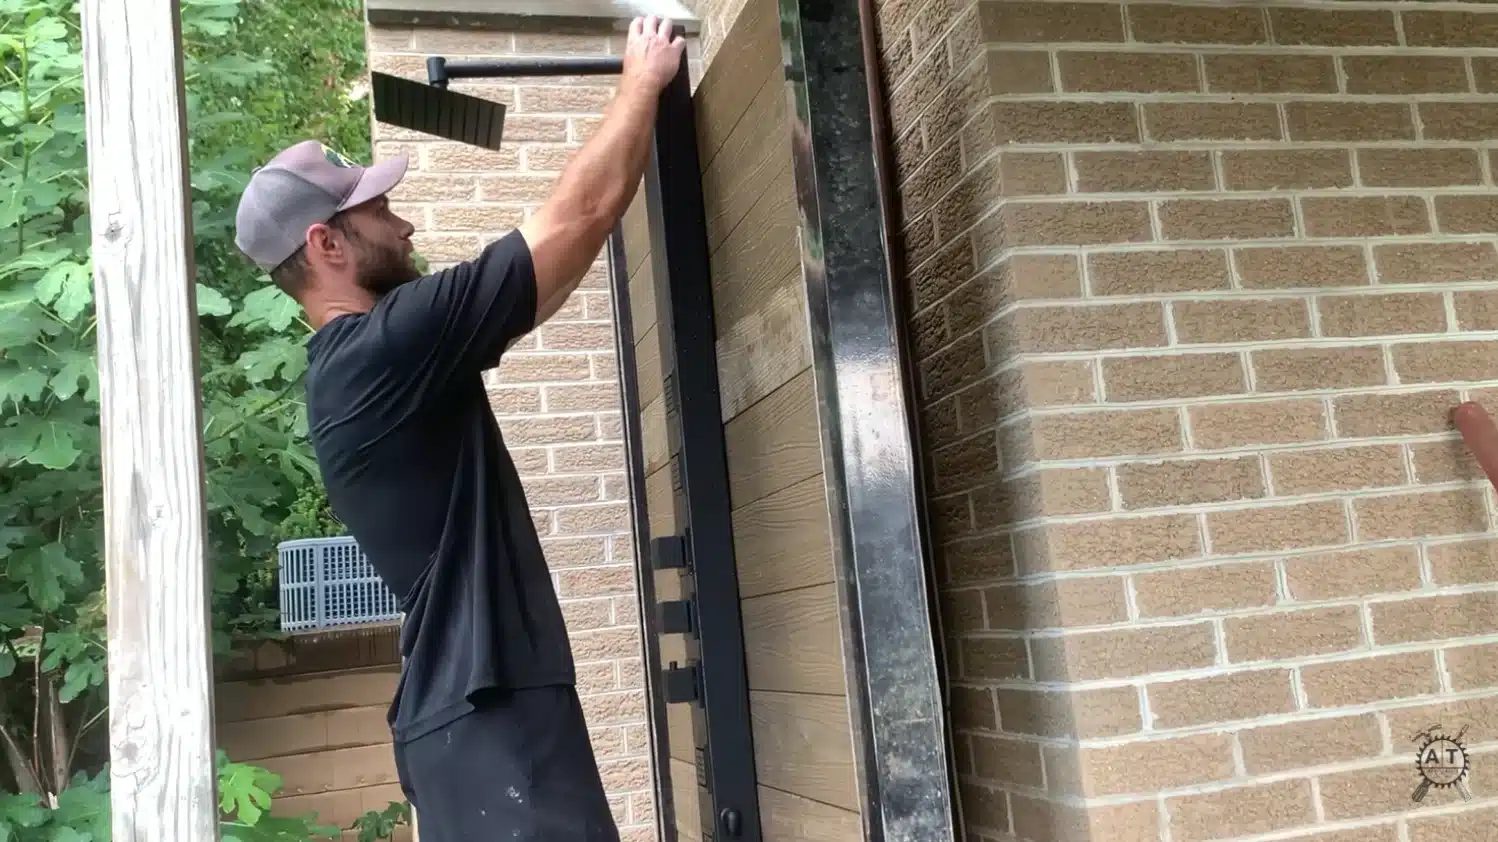
Attach your shower panel (a Vigo panel in this build) to the wall posts using bolts through pre-drilled holes, then connect the water supply lines to the panel’s threaded connections.
Many shower panels include extras like a hand wand or body spray function; mount and connect those at this stage as well, before moving on to any remaining finishing details around the structure.
Pro tip: Cut any wall access holes needed for hose routing before final panel installation; patching afterward is far messier.
Step 8: Add the Final Touches
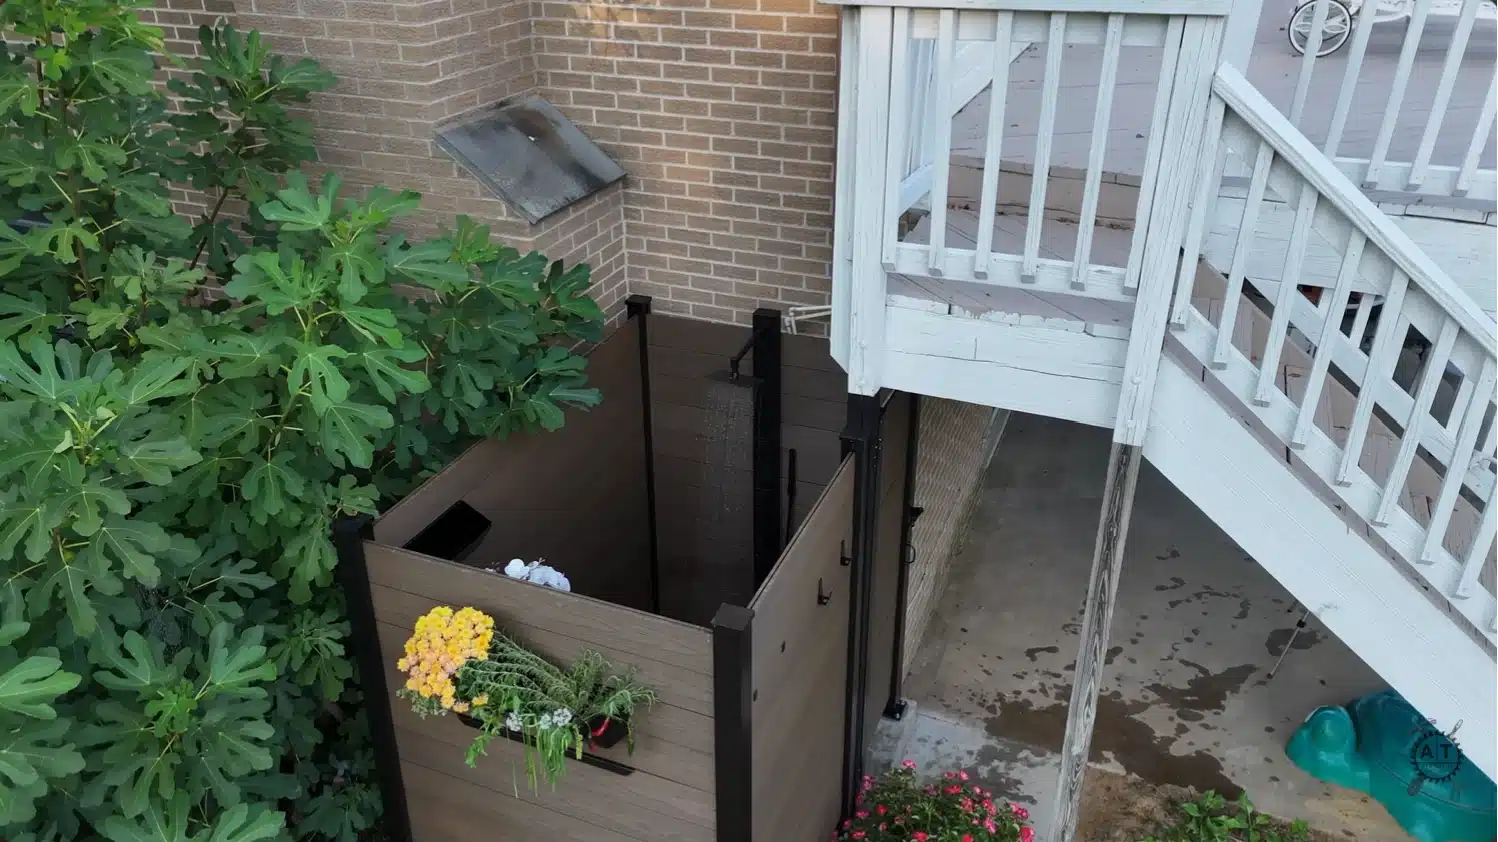
Caulk around the perimeter where the tile meets the concrete curb to create a clean, sealed finish that prevents water from seeping beneath.
Build a matching shower door using the same post-and-slat system, securing it with threaded rod sandwiched through both posts, then attach hinges and a gate latch.
Finish with post caps and any additional accessories, like shelves or towel hooks, to round out the build completely.
Pro tip: Paint hardware like hinges and latches black beforehand for a cleaner, more cohesive finish overall.
Watch It in Action: Video Tutorial
Reading through the steps is helpful, but watching the actual build come together first makes things easier.
So let’s take a quick look:
Source l @AndrewThronImprovements
Outdoor Shower Drainage Explained
Proper drainage prevents standing water, slips, erosion, and moisture damage. Slope the shower floor toward the drain (about ¼ inch per foot) and direct runoff away from foundations, wells, property lines, and storm drains.
Since outdoor shower water may be treated as graywater, always check local plumbing and environmental rules before installation.
| Drainage Option | How It Works | Best Suited for | Key Notes |
|---|---|---|---|
| Gravel Drainage Bed | Water filters through gravel into soil | Light, occasional use with well-draining soil | Avoid clay soil, high water table, and foundation proximity |
| French Drain | Perforated pipe moves water through gravel trench | Redirecting runoff away from shower area | Needs proper slope and filter fabric to prevent clogging |
| Dry Well | Underground pit stores and slowly disperses water | Higher water use or limited space | Must be sized correctly; permits may be required |
| Existing Drain Connection | Links to sewer, septic, or approved graywater line | Permanent, high-use showers | Requires code compliance; never connect to storm drains |
Always run a simple soil percolation test before choosing a system. Avoid sending soapy water into landscapes unless allowed locally and using safe products.
Any sewer or septic tie-in should be approved by a licensed professional or local authority.
Outdoor Shower Design Options
From simple hose-fed setups to permanent poolside installations, these outdoor shower designs offer practical options for different spaces, budgets, privacy needs, and levels of use.
1. Simple Garden Hose Shower
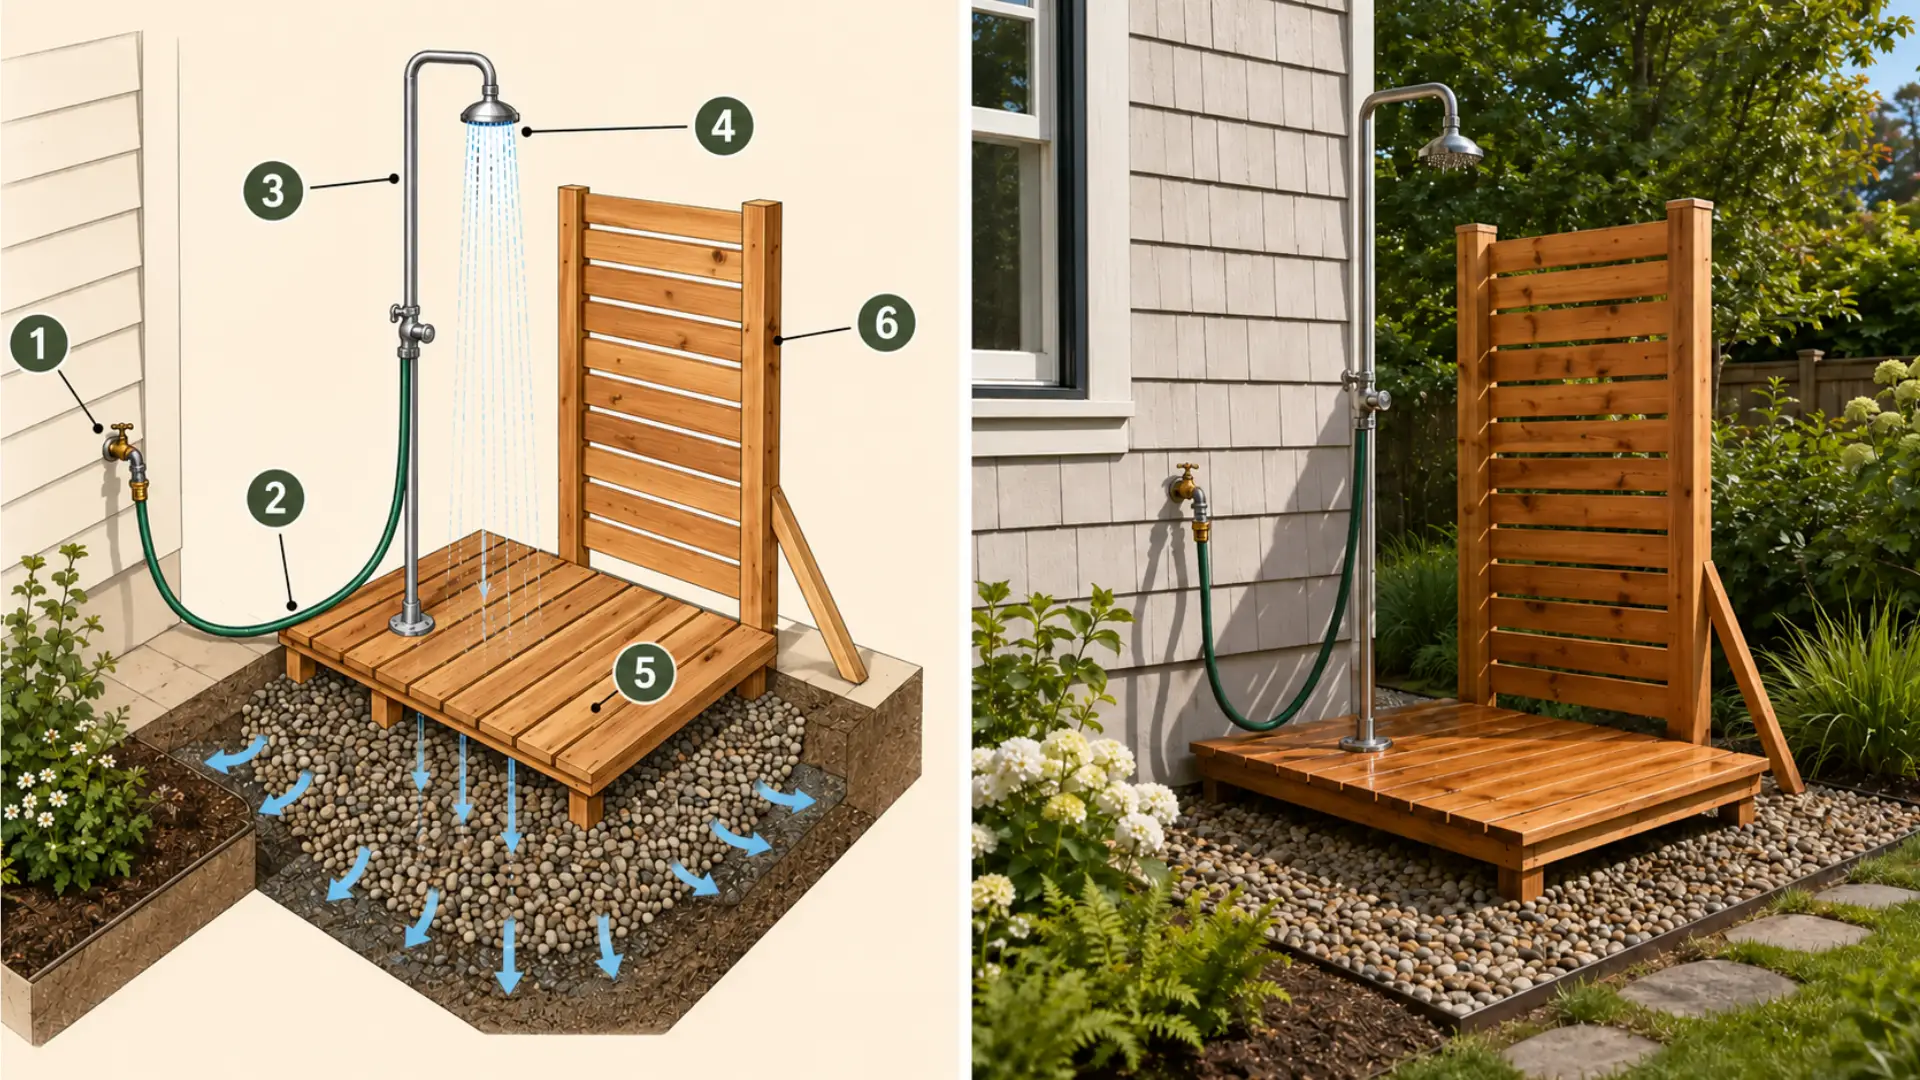
A simple garden hose setup is the easiest way to create a functional outdoor shower with minimal construction.
- Step 1: Choose a sunny location and inspect the outdoor faucet.
- Step 2: Attach a weather-resistant hose and check every connection for leaks.
- Step 3: Secure the portable metal shower riser firmly to the platform.
- Step 4: Fit the showerhead and test for safe, steady flow.
- Step 5: Build a slatted nonslip platform over well-draining gravel, directing runoff away from foundations.
- Step 6: Add a freestanding privacy screen without restricting airflow nearby.
2. Freestanding Cedar Shower
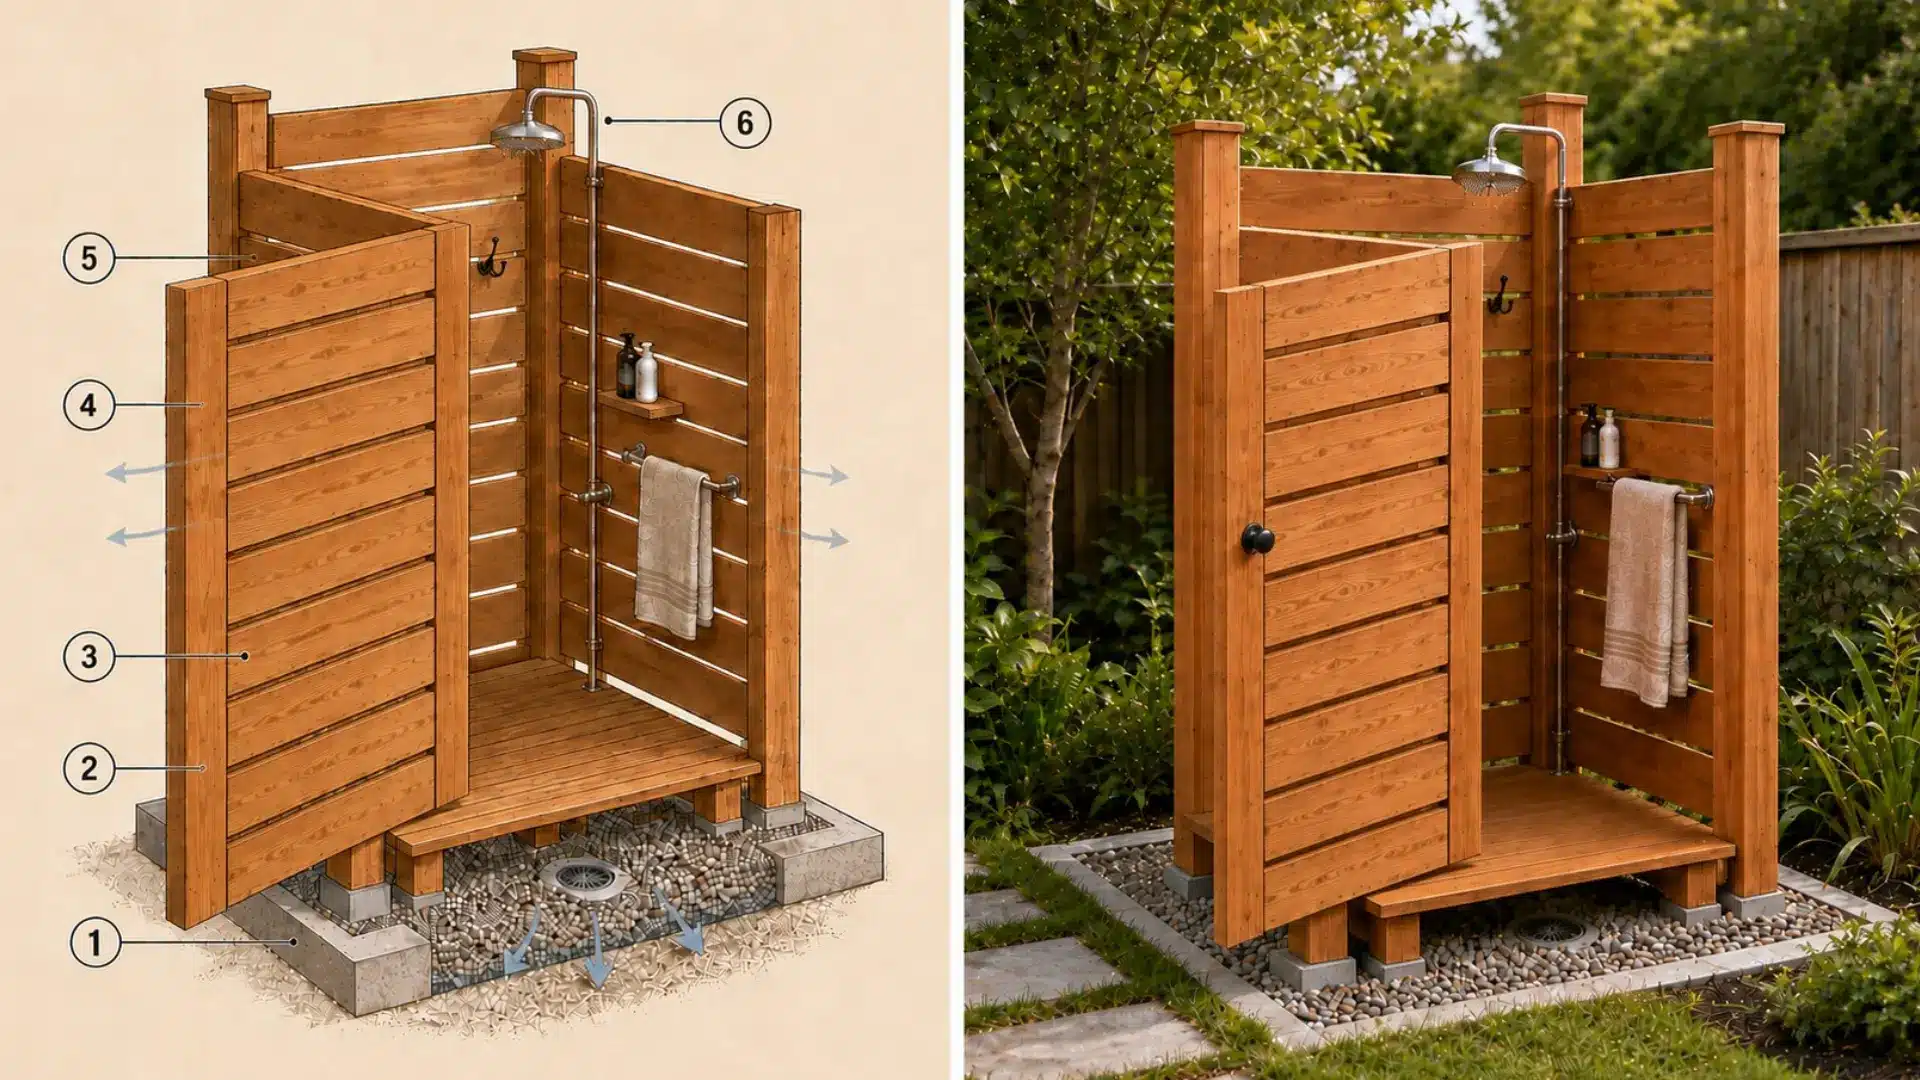
This cedar enclosure provides privacy, airflow, drainage, and convenient shower storage.
- Step 1: Prepare gravel drainage and a raised cedar platform.
- Step 2: Anchor cedar posts securely in concrete footings.
- Step 3: Attach sealed boards to form three private sides.
- Step 4: Leave narrow gaps for airflow and drying.
- Step 5: Add hooks, shelf, towel rail, and entrance panel.
- Step 6: Run water supply up one post and install the showerhead.
3. Wall-Mounted Shower
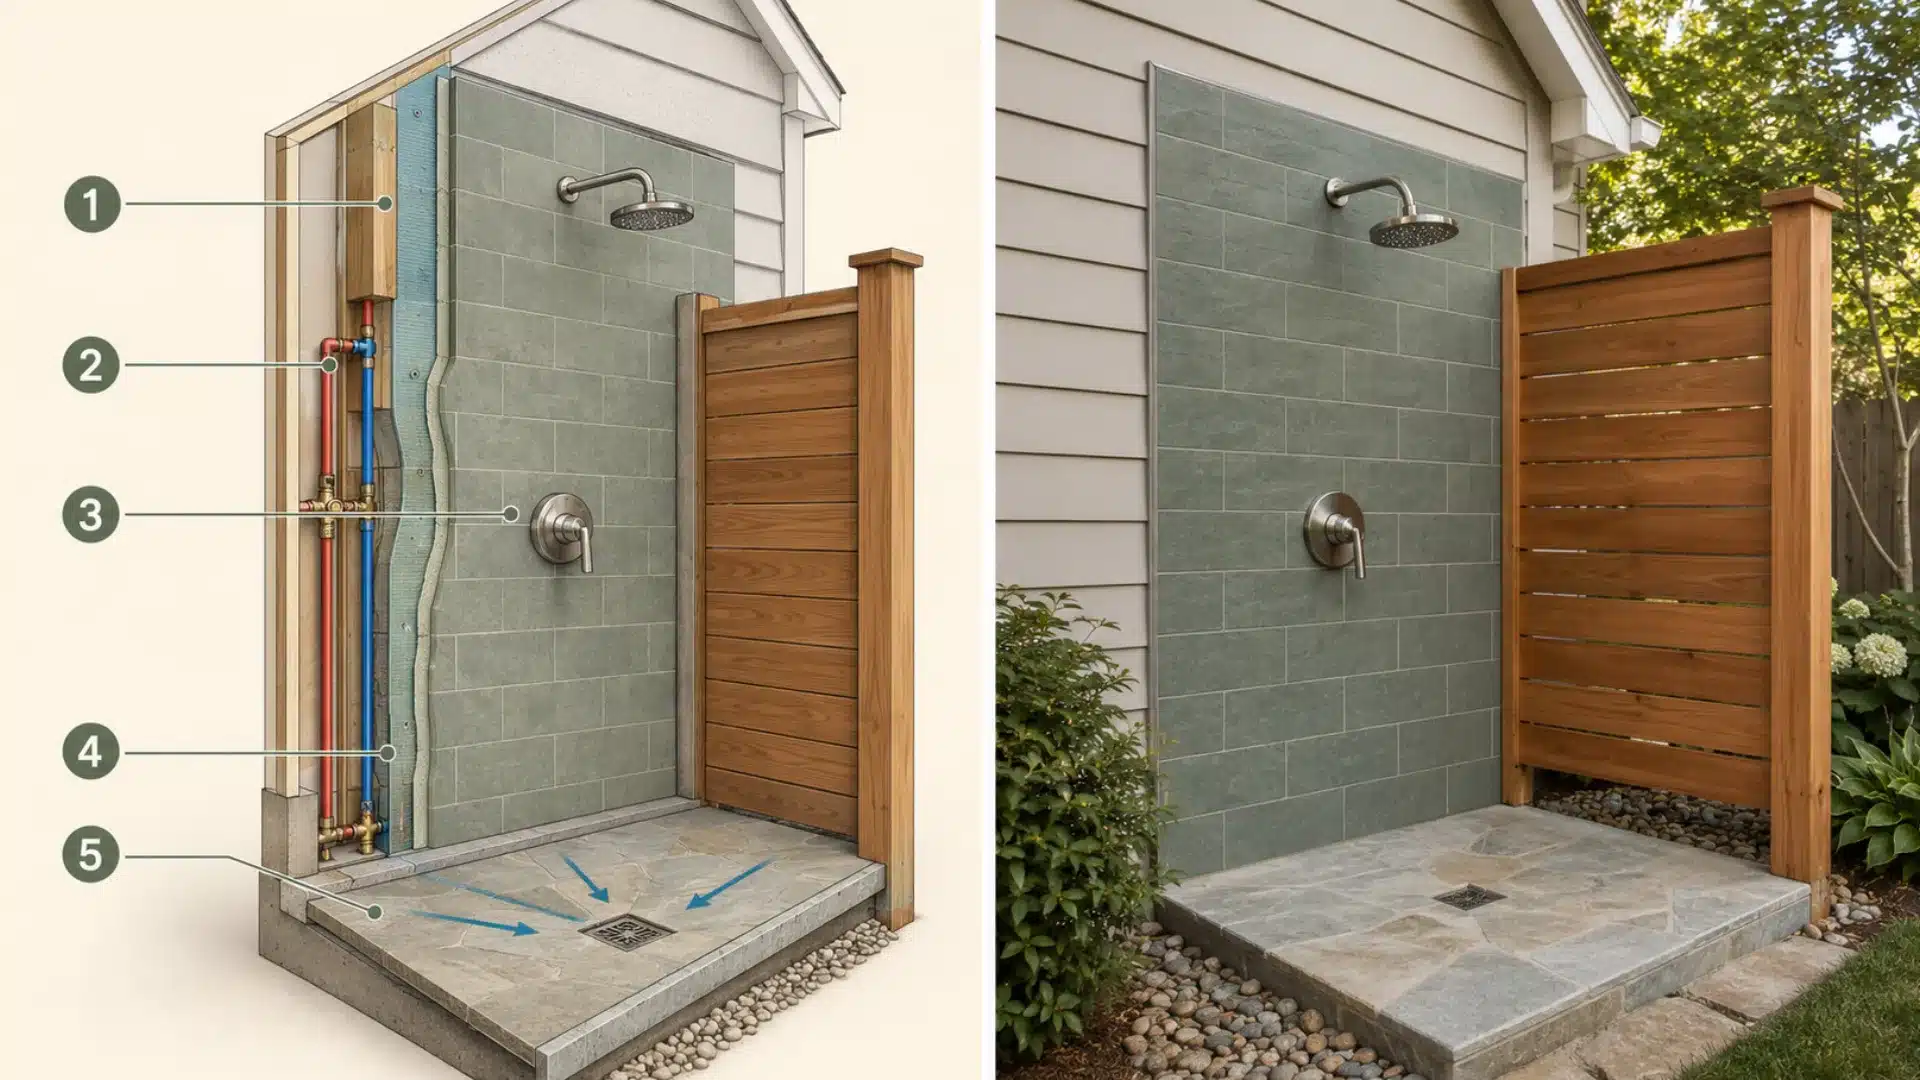
This compact design uses an exterior wall to simplify plumbing, waterproofing, and privacy.
- Step 1: Check for hidden utilities, then install waterproof wall backing.
- Step 2: Run hot and cold supply pipes with corrosion-resistant fittings.
- Step 3: Tile the wall and mount the valve and showerhead comfortably.
- Step 4: Seal every penetration and exposed edge against moisture.
- Step 5: Add a privacy panel, then slope the nonslip floor toward an approved drain.
4. Fence Corner Shower
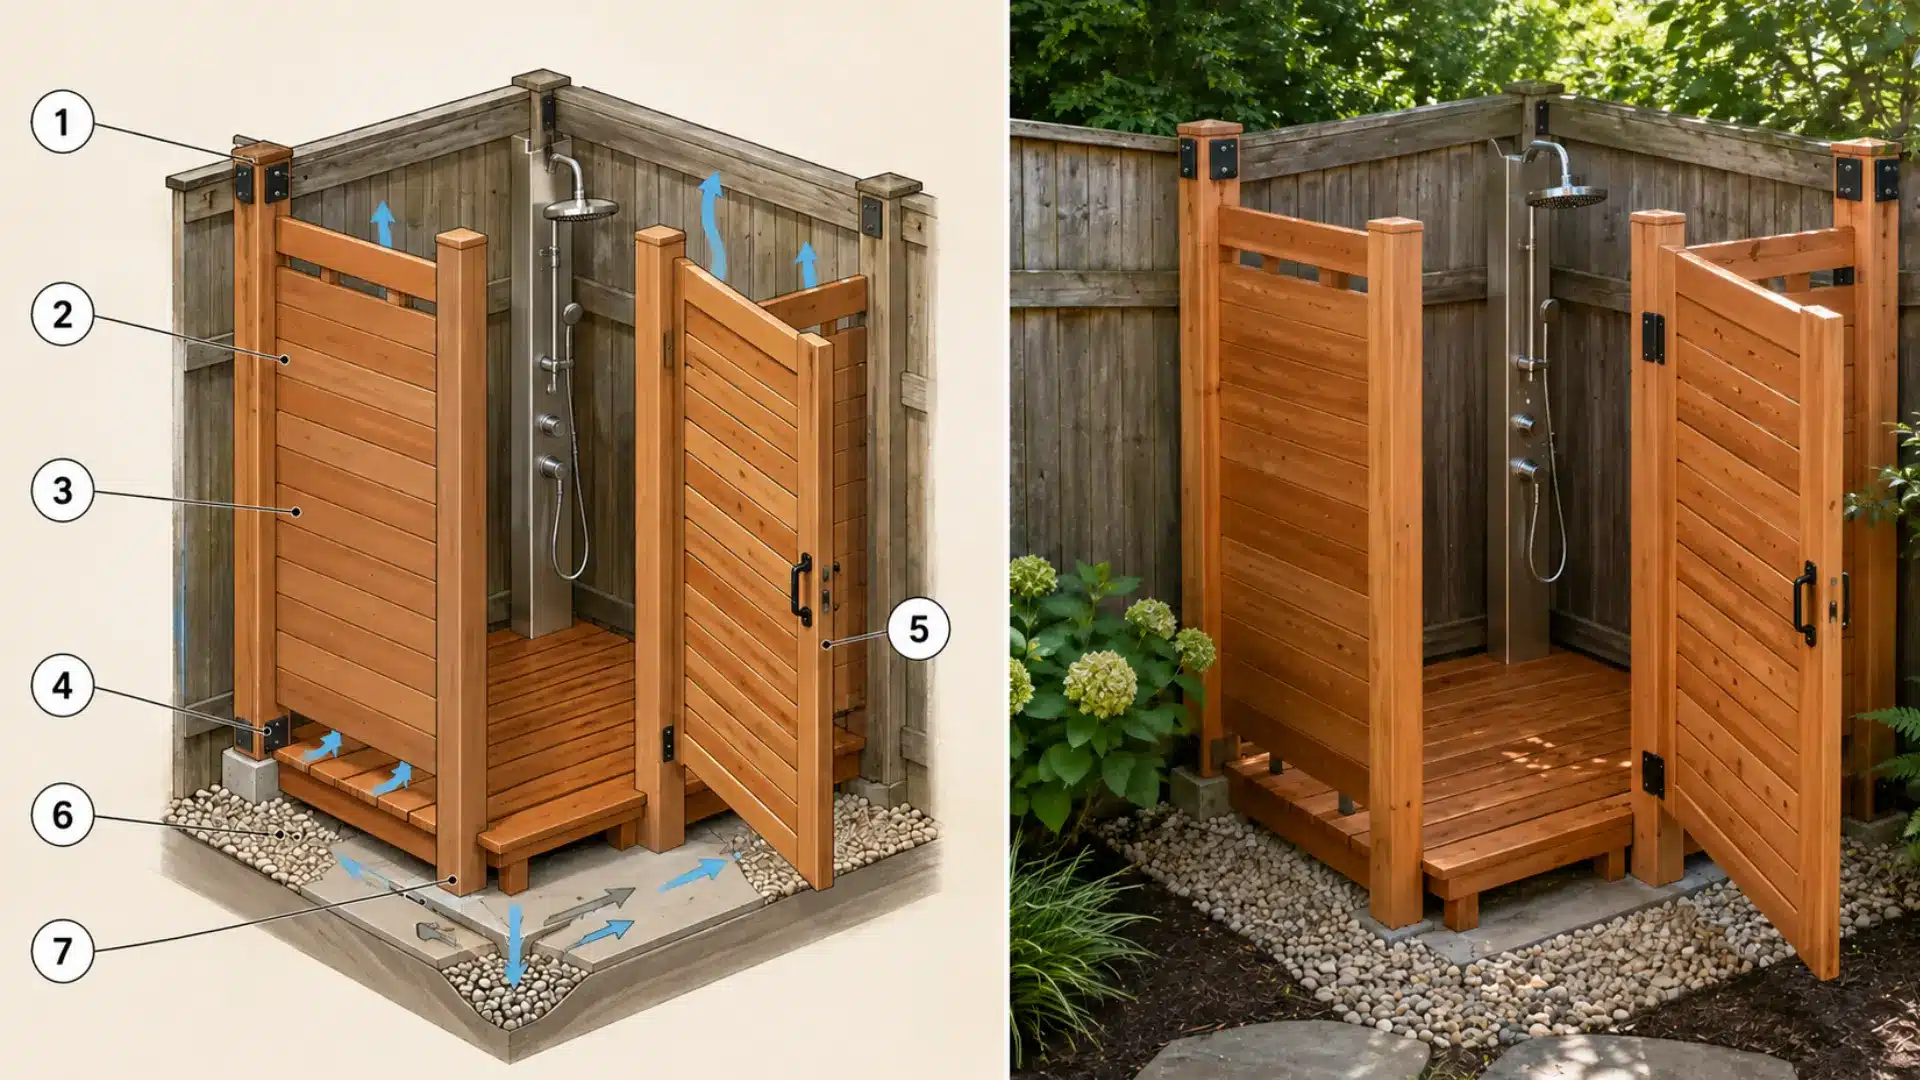
A practical outdoor setup that uses existing fence structure to create a private, functional shower space.
- Step 1: Reinforce the fence corner with weather-resistant brackets.
- Step 2: Install posts to support the enclosure.
- Step 3: Attach sealed privacy boards, leaving ventilation gaps.
- Step 4: Anchor posts securely to concrete footings.
- Step 5: Add a hinged gate with corrosion-resistant hardware.
- Step 6: Lay gravel around the base to absorb runoff.
- Step 7: Install the shower column and slope the nonslip platform toward approved drainage.
5. Poolside Shower
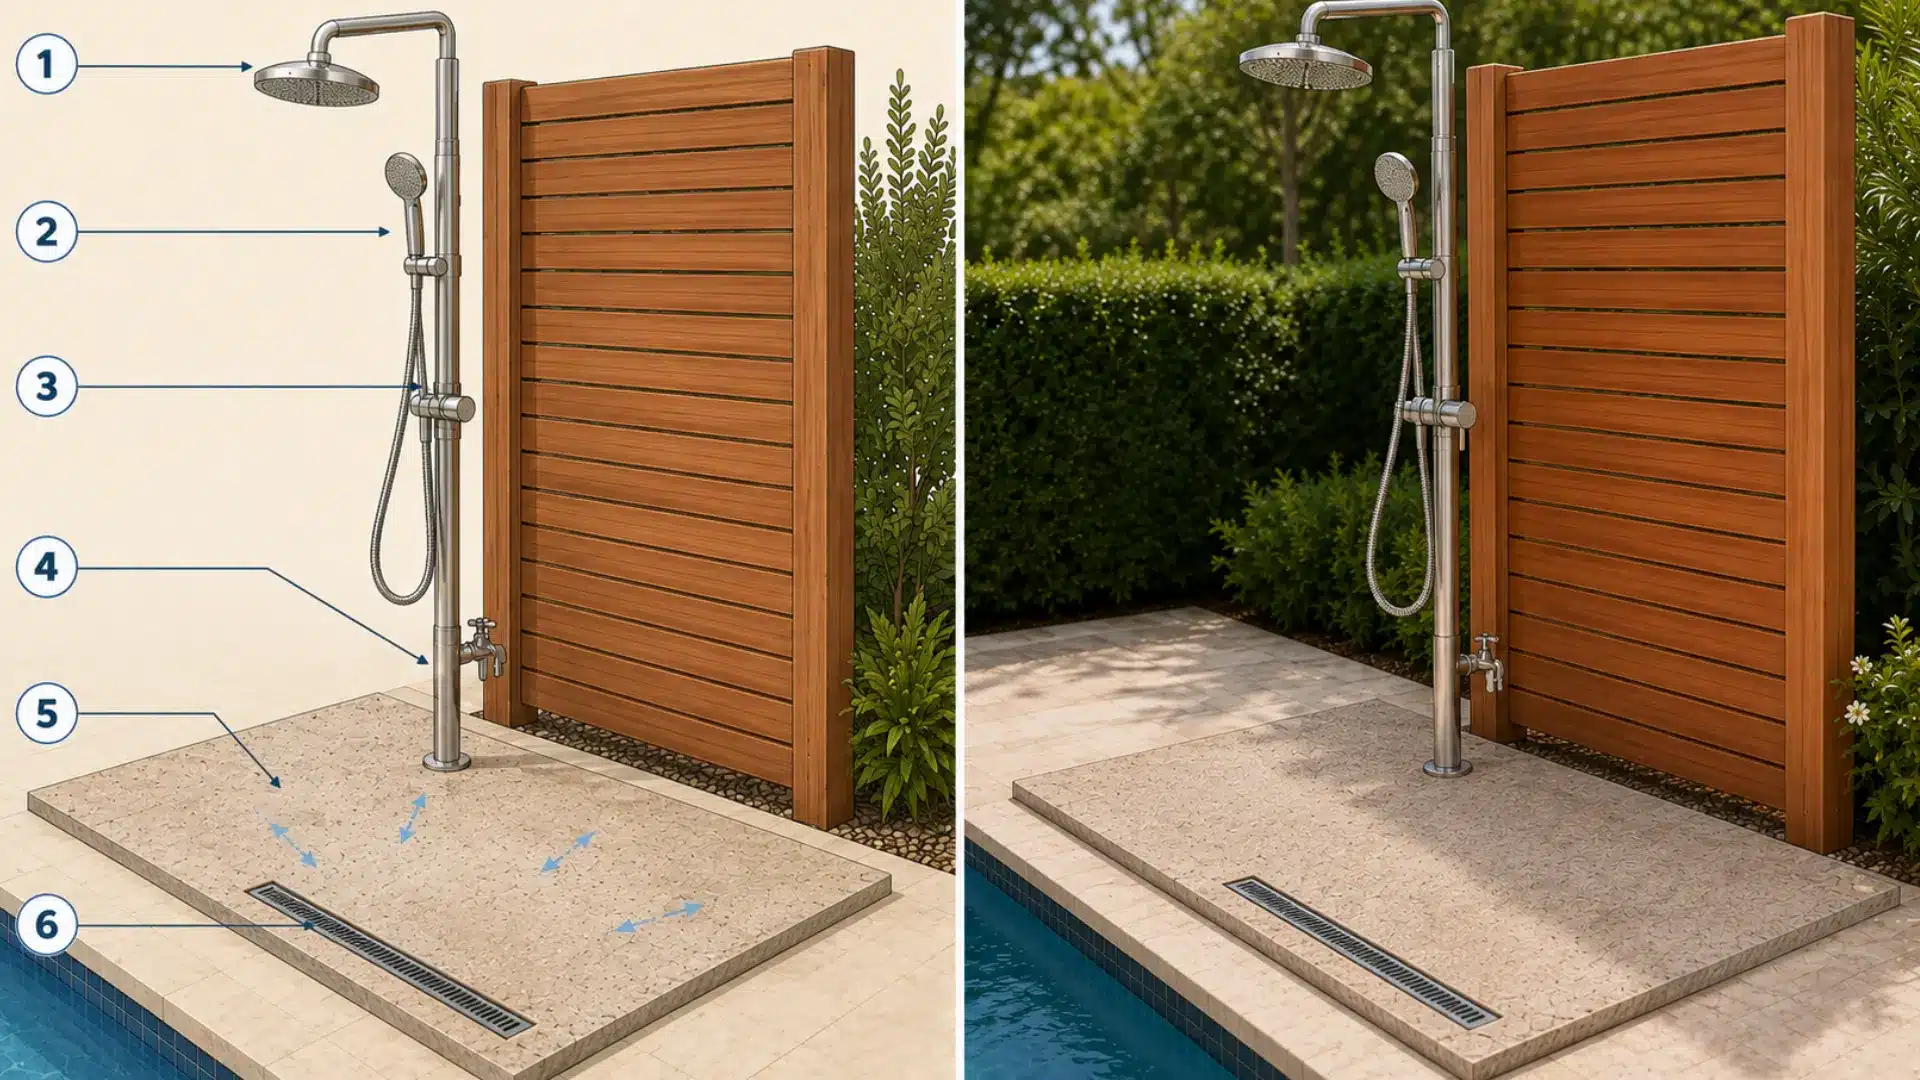
This poolside setup gives swimmers a place to rinse before and after using the pool.
- Step 1: Install a corrosion-resistant overhead showerhead at a comfortable height.
- Step 2: Add a handheld sprayer for flexible rinsing.
- Step 3: Mount durable controls safely away from electrical equipment.
- Step 4: Fit a low foot-rinse tap for convenience.
- Step 5: Build a slip-resistant deck with a matching poolside finish and privacy screen.
- Step 6: Slope the surface toward an approved linear drain.
Garden Hose vs. Permanent Plumbing
Choose between a flexible, budget-friendly garden hose setup and durable permanent plumbing based on your budget, expected use, preferred water temperature, and installation requirements.
| Feature | Garden Hose Setup | Permanent Plumbing |
|---|---|---|
| Installation | Minimal setup, connects to outdoor faucet | Requires professional plumbing and permits |
| Cost | Low cost and budget-friendly | Higher upfront investment |
| Water Supply | Usually cold water only | Hot and cold water options available |
| Flexibility | Easily removable and seasonal use | Fixed installation for long-term use |
| Durability | Hose may wear or degrade over time | Built for long-term outdoor exposure |
| Maintenance | Simple, occasional replacement of hose | Requires plumbing maintenance and winterization |
| Best For | Occasional rinsing and temporary setups | Frequent use and integrated outdoor spaces |
Outdoor Shower Accessories Worth Adding
The right accessories can make your outdoor shower safer, more private, and easier to use while keeping towels, toiletries, and other essentials conveniently organized.
Storage and Hooks: Add a weather-resistant shelf, soap holder, and rustproof hooks to keep toiletries, towels, and clothing organized and safely away from wet surfaces.
Handheld Showerhead: A handheld sprayer makes rinsing children, pets, feet, and outdoor equipment easier while providing better control over water use.
Lighting and Safety Features: Install outdoor-rated lighting, a nonslip mat, and secure grab bars to improve visibility, comfort, and safety, especially when using the shower after sunset.
Foot-Rinse Faucet: Install a low faucet near the shower base for quickly washing sandy feet, muddy shoes, gardening tools, or pets without using the main showerhead.
Privacy Screen or Curtain: Add a weather-resistant screen, curtain, or decorative panel to improve privacy while allowing enough airflow for the shower area to dry properly.
Common Outdoor Shower Building Mistakes
Most outdoor shower builds do not fail all at once. They fail slowly, through small shortcuts that turn into problems months or years later.
- Skipping the Utility Check: Always call 811 before digging. Striking a water or power line can turn a simple project into a costly, dangerous mistake.
- Ignoring Drainage Slope: Skipping a proper slope on the pan or drain trench leads to standing water and eventual rot around the structure.
- Using Regular Concrete for a Sloped Pan: Standard concrete sets too slowly to hold a slope; a rapid-setting mix is non-negotiable here.
- Skipping Post Protection at the Ground Line: Posts rot right where moisture collects; skipping a protective sleeve can cut years off their lifespan.
- Forgetting a Shut-off Valve: Without one, you cannot isolate the water supply for repairs or winterizing later, a small addition that saves a much bigger headache.
Final Thoughts
A DIY outdoor shower comes down to three things: digging, plumbing, and patience.
Most of the work fits into a single weekend, not weeks, and the finished shower tends to get used far more than people expect.
What starts as a rinse-off spot before you track sand through the house quietly turns into the part of the backyard you linger in the longest.
Warm water, fresh air, and a plant hanging nearby change how the whole space feels.
Building your own outdoor shower? Drop your progress pics or questions in the comments below; we would love to see how yours turns out.
Frequently Asked Questions (FAQs)
Do I Need a Permit to Build an Outdoor Shower?
Depends on your local regulations, especially for permanent plumbing. Check with your city or county before digging or connecting to your water supply.
Can I Build One Without Plumbing?
Yes, a simple hose-and-showerhead setup works fine. No plumbing needed, just no hot water or fixed water line either.
Can I Add Hot Water Later If I Start With Cold Only?
Yes, plenty of builders start cold-only and add hot water afterward, sometimes using a simple propane tankless heater without redoing the original plumbing.
Do I Need a Sloped Shower Pan?
Yes, if pouring concrete or tiling. Without a slope toward the drain, water pools instead of draining, leading to mold over time.